


Game Streaming: A Guide into Broadcasting your games to Twitch.tv


Streaming is such a loaded word. It can mean anything from music to films to even games. While the first two are incredibly fun, and we all go around YouTube for the latest cat video, this guide is about the last one: games.
Stream games: How to livestream on Twitch
If you’ve never heard or read about Twitch.tv, you need to get out a bit less and stay on the internet a bit more. Twitch is a platform for live-streaming videos focused predominantly around videogames. From random joes playing through the latest releases, speedrunners mastering games older than they are to massive international online tournaments and even awards ceremonies (like the 2015 BAFTA Game Awards a couple of weeks ago), Twitch is the place to stream games. But how do you go about it? How do you capture your game and sound and then synchronize it with Twitch? Well, there’s a reason you’re reading this guide, aren’t you? Let’s learn how to livestream on Twitch!
It is worthy of note that Twitch’s users have expanded the uses of the platform quite a bit and nowadays you can find anything streaming on the service. One of the biggest news these past months was a pianist streaming an entire concert from his house in a one-man-marathon.
Hardware you need for game streaming broadcasting
Let’s get the Hardware out of the way first. The absolute basic you’ll need for broadcasting is a computer. You have it? Fantastic! Let’s move on. If you want to add a bit more showmanship and do it right, you’ll need a good camera—your laptop’s camera will most likely work but I do recommend getting something on a higher end—there are millions in the market, so pick one. Next, you need a good microphone. I personally recommend dishing out the $200 for a Blue Yeti. It’s a massive thing but it’s one of the best out there for recording. Now comes the tricky bit: Will you broadcast PC Games or will you broadcast console ones? If it’s the former—or you’re using a Playstation 4 or Xbox One—then you’re done and you can move on to the next segment. If you’re not, then you’ll need to get a capture card. What is that? Simply put it’s a machine that acts as a bridge between your console (or handheld) and your computer, allowing you to broadcast what you’re playing. These range in usefulness and price but you’re probably looking at something in the $100-200 range.
Broadcasting Software
Now that we’re done with the hardware prerequisites let’s get on with the software, the really important bit.
There are two major programs to work with if you’re going to stream on Twitch (or YouTube or any other such platform). Let’s see which game streaming software you canfind out there!
XSplit
XSplit Broadcaster is perhaps the most widely known. It’s used by most professionals and it’s extremely easy to use and set up. The problem is that it’s not free. You can get a free license of course but it won’t have all the options available. I personally hold a Pro License, bought one at a hefty discount a few weeks ago, paying close to $100 for 36 months of XSplit Pro.
--> Download XSplit
XSplit is still at the top of its game because of its user friendliness. It’s easy to create titles (text that scrolls around the screen), scenes (if you want to have different layouts for different games), and even add non-game software such as Skype or any random app. You can even add your calculator window to the display if you want to.
OBS
OBS stands for Open Broadcaster Software. As its name is Open you can of course sigh in relief because it is free. OBS has been around for a few years now and it’s slowly becoming XSplit’s better. More and more Twitch streamers are jumping ship from XSplit’s subscription model to OBS.
--> Download Open Broadcaster Software
The downside to OBS is that it’s not as streamlined and things that are relatively simple in XSplit can take some tinkering and learning in OBS. The interface isn’t as clean either but once you master how to use it properly, you can pretty much do everything you can do in the paid software.
Setting up the software to livestream on Twitch.tv
Setting up your broadcast:
For XSplit it’s relatively easy. For this guide we’ll focus on Twitch, though in the future we might do smaller guides for every other platform.
1. Got to Broadcast-> Add Channel -> Twitch
2. On the new window, click Authorize.
3. Input your username and password for your Twitch.tv account.
4. Once logged in and verified, you’ll be prompted for configuration. Let it run as XSplit will determine the best server from which to broadcast your game as well as the general settings for it.
5. You are done. Now to start broadcasting to Twitch just go to Broadcast on the menu and click on your channel’s name and that’s it!
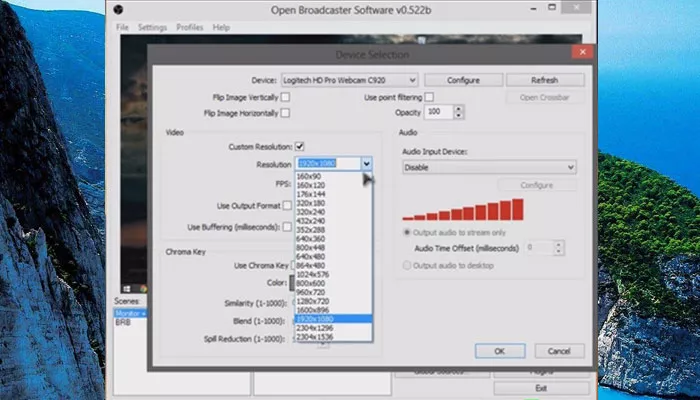
6. You can change the settings at any time. If you’d like to change your resolutions, go to View->Resolution and select the one you prefer. Same with Framerate—30fps is the standard for broadcast but if the video quality is too choppy, you might consider dropping it to 25 along with other adjustments.
Remember: just because XSplit determines your settings, it doesn’t mean it can’t make mistakes. It’s always a good idea to do test broadcasts to see how the settings work.
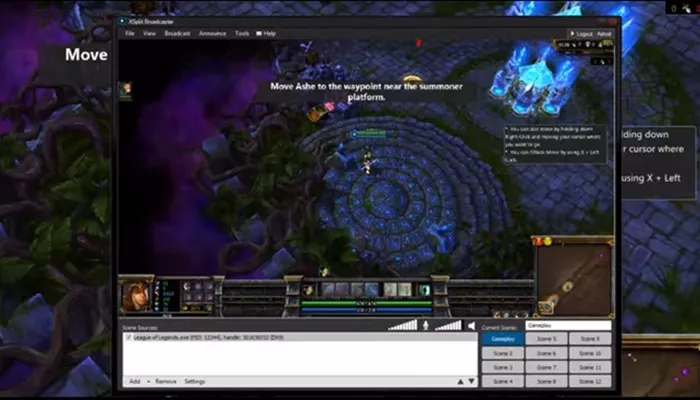
Scene Configuration:
Now you need to configure your scene before you broadcast. For this example we’ll assume PC game, a page on your browser and the camera. Once again, adding stuff on XSplit is very easy. You do it all from the Add Source menu. Let’s see what you need to do to configure the scene with XSplit.
1. For the camera click on Webcam, capture card, video devices.
2. For your browser, click on Screen Capture, and click on the browser window. This is extremely useful if you want to have non-game apps running and visible on the broadcast.
3. For the game, it depends:
- Older games that run on emulators like DOSBox, you need to use Screen Capture.
- Newer games you just launch them then on Add Source you select Game Capture and the name of your game.
4. Once you’ve added the sources you need to move or resize them to fit the scene as you want it.
5. Lastly, on the source list, use the arrows to push the game to the bottom of the current source list.
- This list determines the priority of your sources for the display. If your camera is at the top then it’ll always show, even if you’ve stretched your game to fit the entire scene screen. Make sure you up the priority for the things you want to show during your broadcast.
It takes a bit more work with OBS, let’s see these step-by-step instructions to configure the scene with OBS software:
1. Go into Profiles and add a new one.
- Give it whatever name you wish.
2. Now, open your browser and log into Twitch and go to your profile’s Dashboard.
3. Click on the Stream Key link. Click on Show key.
4. Copy the Stream Key.
- The Stream Key allows anyone with it to broadcast directly to your channel.
5. Back in OBS, with the Profile selected on the list, go to Settings.
6. Got to Broadcast Settings and paste the Stream Key.
7. Set the Streaming Service to Twitch.
8. You will see warnings in red. You can manually configure them all to match the warnings but it’s best if you just press Optimize for it to do so automatically.
9. To Broadcast just press the Start Streaming button. As you can see, it’s easy to stream PC games, isn’t it?
10. If there’s anything you’d like to add to the scene, like a camera or anything.
With that done, now let’s set up the scene. In this case OBS is quite easy. We’ll use the same example as before:
1. On the Scene list, right-click and add a new one.
2. With the scene created, right-click on the sources list and add Game Capture for your game. On the displayed dialog, select the game from the list.
3. Rick-click again and select Global Source -> Camera.
4. Do it one more time and this time select Window Capture and from the list select the browser window/tab.
There’s a lot more involved if you want your broadcast to be as close to professional as possible. We’ll cover that in another guide as we go in-depth into the tools of the trade, such as overlays, subscriber alerts and moderating tools. This should be well enough for starting out and don’t be afraid to experiment.
Make sure to come back for more on video game Streaming, Broadcasting, XSplit and OBS guides right here on Rocky Bytes!
YOU MAY ALSO LIKE:


Zona VS PopCorn Time: Which is the winner?
Let’s be real. Who watches TV nowadays? Why would you let anyone else choose what you are going to watch if you can choose it yourself? When we think about movie nights (we all need them in our lives) going to the cinema is a greatest of options, I’m not going to lie. But who’s got the ...

4shared Releases an improved Music Player
The popular file-hosting service has officially announced the release of its online music player. This new feature is aimed to let users stream music online at 4shared.com with no need to add the tracks to their 4shared accounts. In order to make the music selection fit every user’s taste, the new ...

Game Streaming Guide: How to Grow your Streaming Community on Twitch.tv
Last time we went through a full guide on how to get started and set up for streaming your videogames online on Twitch.tv. We went through the different software you can use, such as XSplit or OBS, and how to prepare everything for your first broadcast: creating a scene and adding sources — game, ...